-
A nice 3rd party sequencer for the LushOne
Posted on July 23rd, 2017 No commentsI often get asked “is there a sequencer for the LushOne” and the answer, currently, is “no, because I never got around to designing one”. Of course, the LushOne has slightly non-standard voltages (at least relative to Eurorack norms) which means that a lot of off-the-shelf sequencers need some external adaptors to nicely connect.
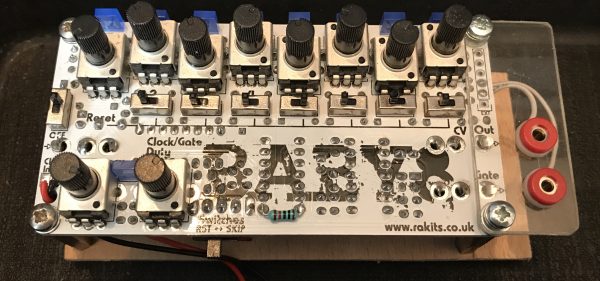
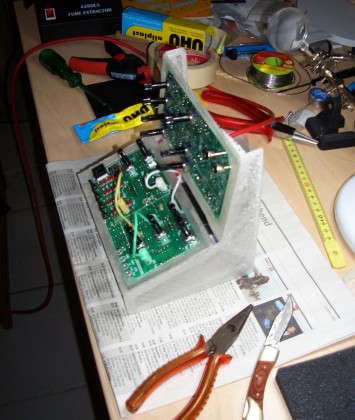
I was delighted recently when a customer who had asked about a sequencer sent me a link to the Baby 8 available from Rakits (also in the UK). This little kit is about as close to an ideal beginner’s sequencer for the LushOne as you can get. The output voltages (0V-5V) are compatible with LushOne gate and CV inputs. The power supply voltage is the same as the LushOne and the design is very similar to the “all on the PCB” approach in the LushOne. The only things that are different are the board size and the connectors.
For the connectors, I added a mezzanine board on the side (see photo) to make the outputs accessible with 2mm banana plugs. In my installation, it doesn’t need an external ground connector because it shares the power supply ground with the rest of the system.
It’s a straight-forward kit to build – all based on through-hole components. It uses the classic 4017 sequencer concept, but despite this simplicity it has some nice touches – variable gate pulse width and a gate skip feature on each step. All in all, a nice addition to any LushOne system.
-
A DSONano tile for my LushOne system
Posted on May 1st, 2017 No commentsPortable oscilloscopes seems to be a product category where nobody ever gets things quite right. There are some signs that the new generation of tablet-based scopes will finally fix that, but for now we make do as best we can. My portable scope is a DSO-Nano v2 which was a present from my wife. I use third-party software on it which has a lot of improvements compared to the official load but it’s still klunky. Having said that, if you just what to quickly check an audio frequency waveform it really is something you can take anywhere.
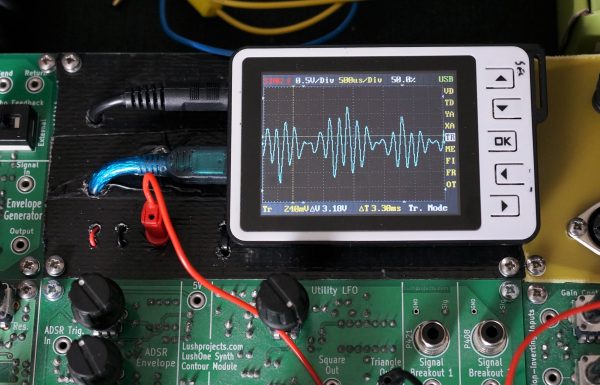
I’ve also found the DSO-Nano useful as something I can quickly fire-up to check signals in my LushOne modular synthesizer system. So, having given my synth a permanent home it seemed natural to fill the one empty tile with a mounting for the DSO-Nano.
The tile was made from scrap items and parts-box contents. For the board I used an old prototype LushOne PCB which I covered in black tape to make it look tidy. The DSO-Nano is just held on with velcro so it can easily be detached for other uses. An old USB-mini lead was cut-up and connected to a 5V regulator to provide power to the scope. An old 3.5mm jack lead (broken at one end) was “upcycled” to provide a break-out to the 2mm sockets used in the LushOne.
I like the result – it gives the system a nice feeling of completeness and adds a valuable tool.
-
Sholto builds a cool LushOne case
Posted on October 30th, 2014 No comments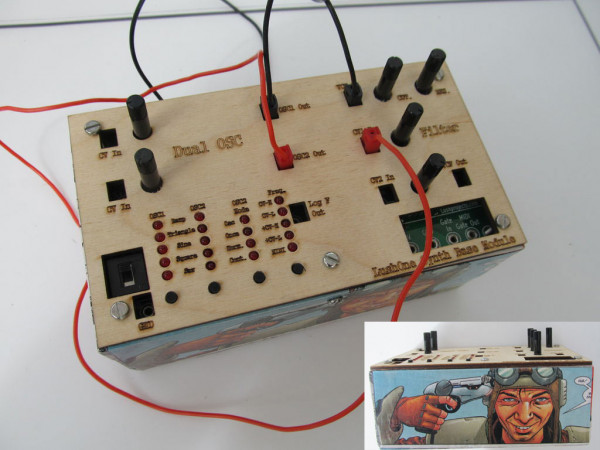
Sholto’s LushOne case
Another excellent case for the LushOne described by Sholto on Instructables. The project work that people do on top of the basic LushOne kits continues to be a delight!
-
Azymbol from Belgium – LushOne case builder extraordinaire
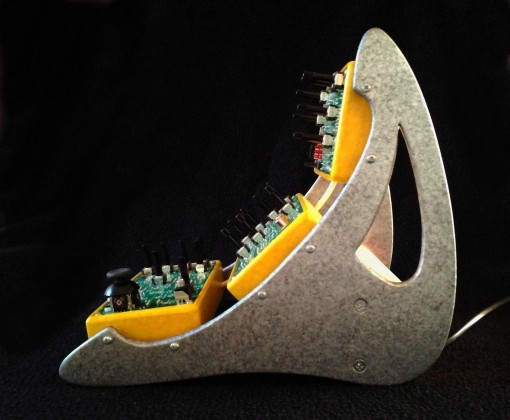
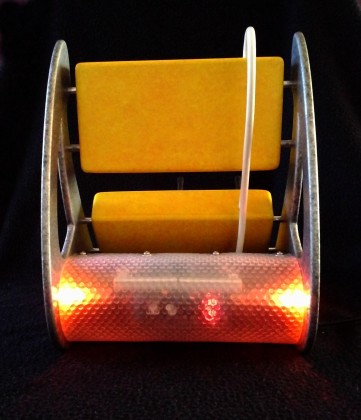
Posted on November 16th, 2013 No commentsOne of the joys of running LushProjects is seeing some of the imaginative work that people put in to building cases for my circuits. Recently Azymbol from Belgium sent me some photos of his LushOne system case which breaks new ground in design and craftsmanship.
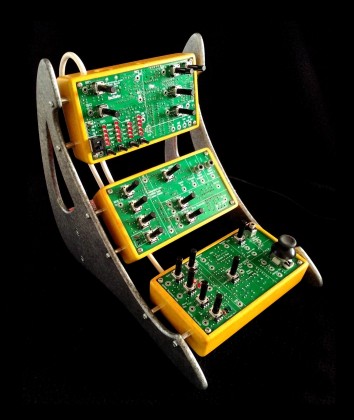
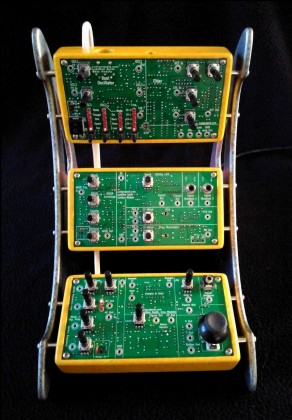
Working in MDF and recycled materials including placemats and tennis ball tins Azymbol has created a design that evokes 60s futurism displaying the controls to maximum advantage on a dramatically curved frame. The colour is applied in acrylic paint and creates carefully judged dramatic contrasts.
Technically Azymbol has used the LushOne base, Contour and Inca modules to build the synth and a Velleman P8042 symmetric power supply he sourced himself.
The design and build are magnificent. Bravo!
-
Building a LushOne system
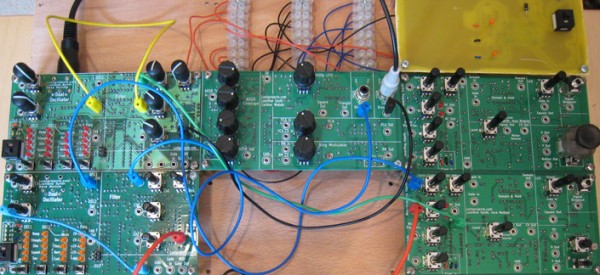
Posted on September 17th, 2013 No commentsIt has always been my intention that it should be possible to use the LushOne to build big systems. Now we’ve got three modules designed we’ve got the basics of a capable modular synthesizer. The building blocks available in the three modules are functionally very similar to those found in classic systems like the mini Moog and MS20. Still, it’s natural to want more of everything and it is particularly helpful to have more oscillators and more mixers in any synthesizer. Over the last few months I’ve been working on my own LushOne system.
The physical design is very simple. It’s just a piece of plywood with holes on a grid to mount LushOne boards on spacers. The layout is set up for a 3 x 3 grid of boards. I’ve designed a special board to hold the RECOM DC to DC converter. Power is distributed by “chocolate block” terminal strips under the LushOne circuit boards. Currently there are two LushOne base modules, one LushOne Contour and two LushOne Inca modules.
The boards have been somewhat modified for my own requirements. The same MIDI input controls both LushOne Base modules. This allows four oscillators to be controlled from the keyboard. The LushOne Base modules are running the prototype version 2 software which provides additional wave shapes as well as the ability to run the OSC2 to an octave higher or lower than the main oscillator. One of the LushOne base modules has been modified so that the OSC2 output is at a signal level rather than at a control voltage level. This makes is really easy to have textured base notes with several harmonics.
The LushOne Contour module is standard. But, one of the LushOne Inca modules has a potentiometer and photo cell fitted instead of the joystick as an alternative way to provide input.
The additional flexibility of the system with so many oscillators and signal processors is great. When I get time I’ll write up in detail some of the modifications. At the moment I am playing with digital delays using the PT2399 chip and I really must build a second LushOne Contour to get a second ADSR.
It may not be the prettiest synth in the world, but I think it looks cool and the bang-for-the-buck is hard to beat.
-
LushOne Base – What should we have in revision 2 firmware?
Posted on August 11th, 2013 No commentsI’ve been prototyping some new firmware for the LushOne base revision 2. I am using my experience with the original to add features that make it easier to create an even bigger variety of sounds and to use the LushOne as a serious instrument. I also wanted to add features that would help with building the LushOne in to bigger systems.
Here’s what I have added so far:
- Settings memory so that selections are saved when the LushOne is powered off. LushOne will return to its previous state allowing you to pick-up from where you left off.
- Three new waveforms for the oscillators. 30% and 15% duty-cycle square wave and combined saw/square (like the MiniMoog). New base sounds enhance the range of capabilities.
- +/- One octave settings for OSC2 in OSC mode. Get really rich, deep tones when mixing with a LushOne Inca.
- Selection of MIDI input channel for use in more complicated MIDI systems.
- Ability to get MIDI velocity output as a control voltage (substitutes for the “log f” out). Allows for touch sensitivity.
What features would you like?
-
LushOne Base – High pass filter mod
Posted on June 20th, 2013 No comments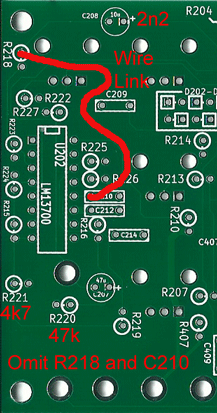
Changes to convert the LushOne Base filter from low-pass to high-pass
Once the LushOne had a fairly complete set of basic synthesizer functions available I always intended to built a powerful multi-oscillator and multi-filter system. You may laugh, but in the back of my mind I had the brief-case sized systems built on the boutique Mattson Mini Modular components.
Once you start thinking about building a full system then you are going to want a high pass filter option to complement the low pass filter in the LushOne Base. Fortunately it is easy to modify the LushOne Base filter to be high pass instead of low pass. Here are the changes:
- Omit R218 and C210 and instead link the two footprints with a wire as shown on the left.
- Change the value of C208 to 2.2nF. This is the same value as C210 so you can do a substitution there. Obviously this capacitor is now non-polar so ignore the polarity markings on the PCB.
- Change R221 to 4.7k
- Change R220 to 47k
That’s all there is to it! Sit back and enjoy some new sounds.
Generally the low pass filter is more useful so if you only have one LushOne Base then I wouldn’t make this a permanent change. However if you want to build a system with more than one LushOne base, or if you want to take the LushOne Base schematic and build your own filter on vero-board then it’s well worth having a high pass option.
If you are using both the filters I recommend putting the high pass first in the signal path and then the low pass. This will reduce the risk of any high-frequency noise getting though in to the output. This arrangement can produce quite natural sounding instruments from the LushOne oscillators.
Remember that with both a high pass and a low pass filter it is rather easy to cut the signal off all together by having non-overlapping filter bands!
Here’s a little multi-tracked sample from a dual-filter LushOne:
-
Equation for op-amp sum/difference amps
Posted on June 2nd, 2013 No commentsWarning: this post contains maths
I can never find on the web or in my text books the general equations for op-amps used as combined multi-input summing and difference amplifiers (ie they have several positive and negative inputs). It makes designing mixers for synthesizers annoyingly awkward as I have to rederive the equations each time. So, to save myself having to work everything out from scratch again, here are my derivations and notes on multi-input Op-Amp circuits. I will also take the opportunity to point out some interesting parts of the results.
Main Results
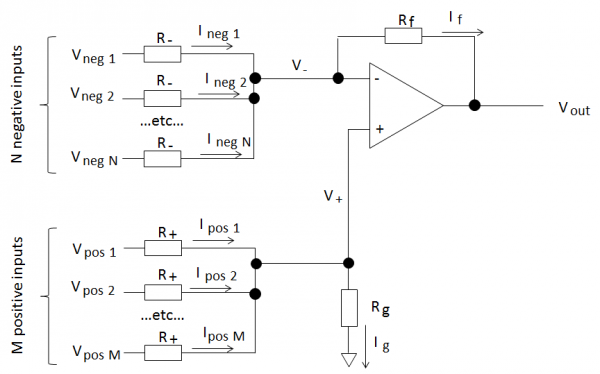
So, here’s the setup:
We have an op-amp circuit with “N” negative inputs and “M” positive inputs as shown above. All the positive and negative inputs are identical.
For an ideal op-amp the output is:

Or, in other words the negative gain is:

The positive gain is:
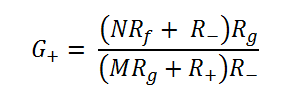
Positive and negative gain
The negative gain is nice and easy and only depends on the input and feedback resistors and not on any other variables, like the number of inputs. Why is this? Well the inverting input of the op-amp is a virtual ground and the voltage isn’t changed by the negative inputs. Therefore the current through each negative input only depends on its input voltage. You can have as many or as few negative inputs as you like and it works the same.
The positive inputs are not in this lucky position! Voltages at the positive inputs change the voltage at both the inverting and non-inverting inputs of the op-amp. The non-inverting input voltage changes because of the voltage drop over Rg. The inverting input voltage changes due to the feedback action of the op-amp keeping the input voltages ideally identical. This means that currents flowing through all the input branches depend on the positive input voltages and hence the complicated positive gain equation.
Limits on positive gain values
Once the negative gain is set, this configuration limits the range of values of the positive gain depending on the number of positive and negative inputs. One particular example:
If the negative gain G- > 1 and number of negative inputs N < M, the number of positive inputs then G+ < G-.To derive this then consider that the maximum positive gain is when the input resistors R+ = 0 (obvious from the circuit and also by inspection of the equation).
Special cases and derivation
There are several interesting special cases from these equations (including the basic op-amp single input amplifiers) and the derivation is worth reading. So I don’t fill the blog with equations you can read it all in this pdf file.
-
Third LushOne module – development report
Posted on May 16th, 2013 No commentsThe last few weeks I’ve been busy working on the third module for the LushOne synth. This module is going to be all about signal processing and noise effects.
This is what’s planned to go in:
- Four channel mixer/signal processor – combine CVs or audio signals within the LushOne or change signal levels for compatibility with external equipment.
- Noise source for percussive and random effects
- Sample and hold function for interesting effects
- Extra square wave LFO, primarily intended to drive the Sample and Hold
- 3.5 mm jack breakout for easy interfacing to Eurorack modular synths
- Joystick for dynamic control of two analog control voltages
All this packed on to the same size board as the LushOne base and the LushOne Contour.
All the circuits are prototyped on breadboard. Just finishing the first PCB layout over the next few days.
Suggestions for a suitable name for this module are welcome.
-
3D Case Printing for the LushOne
Posted on April 15th, 2013 No commentsAnother nice LushOne project – Simon Reimers in Germany made this rather elegant printed case for his LushOne and LushOne contour. He calls it the “MicroMoog”, but I am really not worthy of that accolade. I do like his comment of “tiny size and mighty sound” though.
Simon Reimers’ LushOne with printed case


