

-
Glitch – A film about circuit bending
Posted on June 16th, 2010 No commentsMe (and my stuff) crop up nicely in this short film
-
Cleaning a projector
Posted on June 7th, 2010 No commentsSafety note: Do not look in to the lens of projectors when they are at full (or close to full) brightness. Don’t open mains powered electronics unless you know what you are doing and take proper safety precautions.
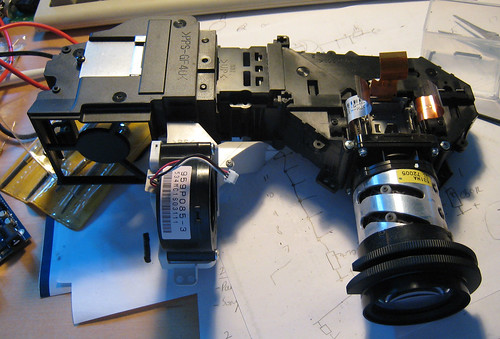
I bought a Mitsubishi XL5U projector from the Dunstable Downs Radio Club car boot sale for £17. I was told that the bulb was working, but nothing else about it. When I got the projector home I found that the picture was very fuzzy – basically useless. Time to look at what might have gone wrong.
My first thought was that there could be a problem with dust in the projector. There was the sticker of a projector rental/service company on the case and at first sight it looked well maintained. No dust visible from the outside. I did notice that if you looked indirectly through the lens when the bulb was warming up before it reached full brightness you could see what looked like layers of dust in the frame. Only thing to do was to open the case up and see what was happening. Getting to the optics involved opening the case and then removing the main circuit board. Not a very easy job, but OK with care.
Once I got to the optics I could see that the dust problem was really bad. The easiest thing to clean was the three polariser screens (one for each colour) that sit before the LCDs. These could be lifted out by undoing one screw on the top. Each filter had a thick layer of dust on it and I cleaned them with a camera lens cleaner. From reading I did later it turns out you are supposed to mark the position of these filters (they are adjustable) before removing them. Fortunately I was able to see where they had been held in place by marks on the plastic. Also note that the polarisers are specific to the colour path – don’t mix up the three.
The polarisers looked like the worst part of the optics, but there was still plenty of dust visible on other parts that I couldn’t reach to clean. I decided that a more drastic approach was required. I started to dismantle all the optical path to clean as much as I could. After undoing lots of screws I got the optical path out of the case. This allowed me to remove the module that contains the three LCDs and the prism used to combine the images. This turns out to be held in place by just one screw (that you can only access from the bottom of the optical path).
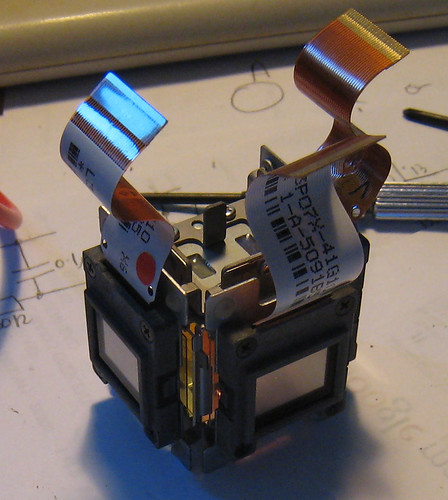
With this module out I was able to clean the outside of the LCDs and the projection lens with a lens cleaner, but there was more dust trapped between the LCDs and the prism that I couldn’t reach. Firstly I tried blowing this away with compressed air but even at very high pressure some of the dust was so embedded it wouldn’t move. At this point I made a mistake – I decided to remove the LCDs from the frame by undoing the corner screws. With the LCDs removed I could clean everything easily, but trouble lurked ahead. If I was doing it again I would leave the LCDs in place and use a very soft brush to clean between the LCD and the prism.
Cleaning the rest of the optics was easier. Unclipping plastic tags allows you to take the top off the light path – this allows cleaning of the various lenses and filters used there. Take great care here – the parts are delicate, mark easily and the orientation is important.

Time to get everything back together and see if all this cleaning has worked. Immediately two things were clear:
1) The image was nice, bright and sharp
2) The three colour images from the three LCDs were completely misalignedWhen I took the LCDs off I worried that they had been specially aligned. I was right to be worried, once you loosen the screws these LCDs can move enough to wreck the alignment.
Fixing the alignment problem I created required a lot of trial, error and luck. Initially I took the prism out again (which required a complete dismantling of the system) and tried to fix the alignment by looking in to the prism under various lights. The result from these was better than the first attempt, but still effectively useless.
After a bit more experiments I found a solution that worked for me. I removed the screw that held the prism in place and set up the projector so the lamp would light but so that the prism could be removed and adjusted without having to power on and off again. To do this I ran the projector with the LCD’s flexible PCB strips disconnected from the control board. I then fiddled with the LCDs to try and bring them back in to line. With the ability to pull the prism out, make an adjustment and then reinsert I was able to try lots of combinations. I tried tightening the four screws on each LCD in different orders and tried moving the LCDs a little based on the observed errors. Eventually the three colours seemed to come in to alignment. I reconnected everything, crossed my fingers and powered on. Pow – nice bright picture, colour frames spot on aligned.
Interesting experience to explore the inside of these projectors and a good-value buy with a bit of cleaning.