Lushprojects Blog
Projects in music, video, art, technology and learning

-
Vibrati Punk Console – First Chance to Build
Posted on June 2nd, 2011 No comments
Retro Electronic Sound
Evening Build Workshop
Tue June 14th, 6:30pm, Nottingham Hackspace
All welcomeThe first batch of kits for the Vibrati Punk Console (aka “Atari Punk Console 2.0”) are in. We are going to have a building session at Nottinghack on June 14th. So if you like electronic music or want to try your hand at soldering then come along.
The Vibrati Punk Console is a beginner-friendly electronic music project that can be finished in one evening. The simple circuit generates an amazing range of retro warbles, screams, glitches, fuzzes and tone ramps.
Workshop Cost: £20 includes teaching and all build materials.

For those that can’t make it to Nottingham the kit should be available to buy on the web soon.
-
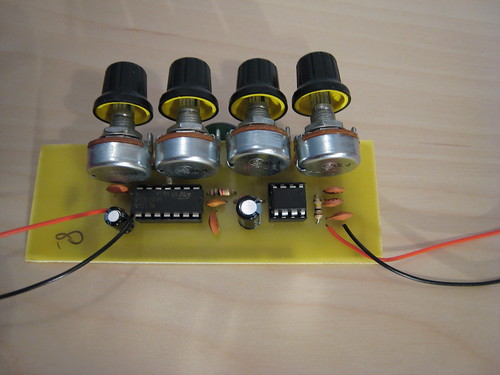
First Home Made PCB
Posted on April 22nd, 2011 No commentsFor most of my projects I either need quite dense PCBs that I get professionally made or I use point to point wiring techniques. At the moment though I am working on a new electronics kit under the working title of “Vibrati Punk Console” which is kind-of an “Atari Punk Console 2.0”. To validate the PCB design before sending the first batch for manufacture I decided to make a home made board.
With great timing Matt Little had just done a PCB workshop at Nottingham Hackspace so I had good practical experience. Armed with a UV exposure box from the last DDRC Car Boot Sale and a set of parts from Rapid Electronics I went out to make my PCB.
I basically followed the tips from Mike Harrison’s guide. For etching I used the Seno GS etching system which manages to keep 99.999% of the really nasty stuff in a bag.
I was delighted that attempt number 1 yielded an almost perfect result.
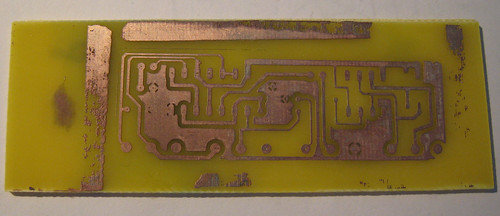
I made a second board as a backup, but that was a complete disaster. Once I developed the UV board you could see that the fine lines weren’t sharp and once I started etching they disappeared all together. Still not 100% sure what the problem was there. Possibly over-exposure to the UV or the mask not being completely flush to the board when it was exposed. Anyway one board was enough so as it was getting late I stopped there.
One thing I would note for future builds – the “automatic” pad size in Eagle is too small for home made boards. Use larger pads than the eagle defaults to make your life easier.
With the board drilled and everything mounted I am delighted to say it worked first time.
-
Old-school display
Posted on April 1st, 2011 No commentsI picked-up a job-lot of old LEDs from my friend Mike Harrison. One thing that immediately caught me eye in there was an old Hewlett-Packard 5082-7415. Anyone under about 35 won’t recognise this item, but in the good old days the first 7 segment LED displays were so small that they needed to have a lens over the top to make them large enough to read. The display on my first calculator was just like this and I’ve retained a fondness for them.
In this case the display had obviously been taken from equipment and the pins are quite badly damaged. However I managed to rig it in to an upside-down IC tester clip. Once in there I could confirm that electrically all was working perfectly.
At the moment I am building the display in to a nice little surprise circuit. More on that soon, but here is the prototype:
-
Makerfaire UK (2011)
Posted on April 1st, 2011 No commentsBetter late than never: a few comments on Makerfaire UK.
Once again the crew in Newcastle did us proud. Got a great location for Lunar Lander and Cyclepong. Both machines were crowded all day. In the case of Cyclepong it all got a bit much and the spokes on one of the bikes sheered off!
Great to see a few old friends again including John Honniball and his lovely plotter and the Oomlout team.
-
Time to go home – No longer on Southwold Pier
Posted on February 4th, 2011 No commentsWell folks – all good things must come to an end. Southwold Pier are having a reorganization and have decided it’s time to swap things around in the arcade. Long at the short of it is Lunar Lander and Cyclepong are going to come home this weekend. Back to the workshop to see what several years of heavy use on the pier has done to them.
For those that want a change to play them this year then look out for them at MakerFaire UK 2011.
-
Electronics for Artists – The Photos
Posted on November 1st, 2010 No comments
Last weekend I led the workshop “Electronics for Artists” at South Hill Park in Bracknell. Photos are now on line. Thanks to all the group for your enthusiasm and Martin for organising. Listen out for my wise words on the Digital Media Centre podcast.
-
Solder Soldiers v2.0
Posted on July 2nd, 2010 No comments
Solder Soldiers v2.0 took place in Leicester in June. Check out the gallery linked above for the cool stuff on display.
I was asked to perform on the opening night.
-
Glitch – A film about circuit bending
Posted on June 16th, 2010 No commentsMe (and my stuff) crop up nicely in this short film
-
Cleaning a projector
Posted on June 7th, 2010 No commentsSafety note: Do not look in to the lens of projectors when they are at full (or close to full) brightness. Don’t open mains powered electronics unless you know what you are doing and take proper safety precautions.
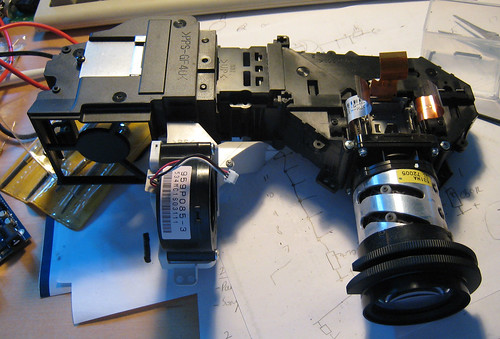
I bought a Mitsubishi XL5U projector from the Dunstable Downs Radio Club car boot sale for £17. I was told that the bulb was working, but nothing else about it. When I got the projector home I found that the picture was very fuzzy – basically useless. Time to look at what might have gone wrong.
My first thought was that there could be a problem with dust in the projector. There was the sticker of a projector rental/service company on the case and at first sight it looked well maintained. No dust visible from the outside. I did notice that if you looked indirectly through the lens when the bulb was warming up before it reached full brightness you could see what looked like layers of dust in the frame. Only thing to do was to open the case up and see what was happening. Getting to the optics involved opening the case and then removing the main circuit board. Not a very easy job, but OK with care.
Once I got to the optics I could see that the dust problem was really bad. The easiest thing to clean was the three polariser screens (one for each colour) that sit before the LCDs. These could be lifted out by undoing one screw on the top. Each filter had a thick layer of dust on it and I cleaned them with a camera lens cleaner. From reading I did later it turns out you are supposed to mark the position of these filters (they are adjustable) before removing them. Fortunately I was able to see where they had been held in place by marks on the plastic. Also note that the polarisers are specific to the colour path – don’t mix up the three.
The polarisers looked like the worst part of the optics, but there was still plenty of dust visible on other parts that I couldn’t reach to clean. I decided that a more drastic approach was required. I started to dismantle all the optical path to clean as much as I could. After undoing lots of screws I got the optical path out of the case. This allowed me to remove the module that contains the three LCDs and the prism used to combine the images. This turns out to be held in place by just one screw (that you can only access from the bottom of the optical path).
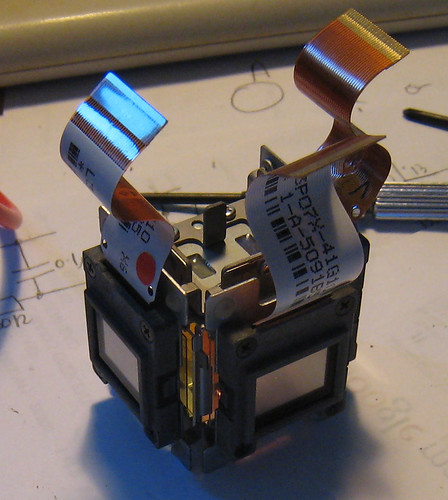
With this module out I was able to clean the outside of the LCDs and the projection lens with a lens cleaner, but there was more dust trapped between the LCDs and the prism that I couldn’t reach. Firstly I tried blowing this away with compressed air but even at very high pressure some of the dust was so embedded it wouldn’t move. At this point I made a mistake – I decided to remove the LCDs from the frame by undoing the corner screws. With the LCDs removed I could clean everything easily, but trouble lurked ahead. If I was doing it again I would leave the LCDs in place and use a very soft brush to clean between the LCD and the prism.
Cleaning the rest of the optics was easier. Unclipping plastic tags allows you to take the top off the light path – this allows cleaning of the various lenses and filters used there. Take great care here – the parts are delicate, mark easily and the orientation is important.

Time to get everything back together and see if all this cleaning has worked. Immediately two things were clear:
1) The image was nice, bright and sharp
2) The three colour images from the three LCDs were completely misalignedWhen I took the LCDs off I worried that they had been specially aligned. I was right to be worried, once you loosen the screws these LCDs can move enough to wreck the alignment.
Fixing the alignment problem I created required a lot of trial, error and luck. Initially I took the prism out again (which required a complete dismantling of the system) and tried to fix the alignment by looking in to the prism under various lights. The result from these was better than the first attempt, but still effectively useless.
After a bit more experiments I found a solution that worked for me. I removed the screw that held the prism in place and set up the projector so the lamp would light but so that the prism could be removed and adjusted without having to power on and off again. To do this I ran the projector with the LCD’s flexible PCB strips disconnected from the control board. I then fiddled with the LCDs to try and bring them back in to line. With the ability to pull the prism out, make an adjustment and then reinsert I was able to try lots of combinations. I tried tightening the four screws on each LCD in different orders and tried moving the LCDs a little based on the observed errors. Eventually the three colours seemed to come in to alignment. I reconnected everything, crossed my fingers and powered on. Pow – nice bright picture, colour frames spot on aligned.
Interesting experience to explore the inside of these projectors and a good-value buy with a bit of cleaning.
-
Video bends on film
Posted on March 30th, 2010 No commentsNice documentary about the last circuit bending workshop at South Hill Park. I am in the middle talking about video circuit bending with a few demos too.