
Note the Vibrati Punk Console kits are no longer available - these pages are kept for reference and interest. You can find the schematics and source code in these documents, but the PCB designs are not currently public.
Build Step 2 - Mouting Integrated Circuit Sockets
The Vibrati Punk Console is built around a single
printed
circuit board (PCB). All the components are placed on one side of the
circuit
board (the “component side” or top). The component side has labels
showing
where to place components. The components are soldered in place on the
other
side of the board (the “track side” or bottom). The track side has the
metal
tracks or traces that connect the components.
I like to build circuits up starting from the
shortest
components and working towards the tallest ones. This means that when
you place
components on the board they don’t fall out easily when you turn the
board over
to solder.
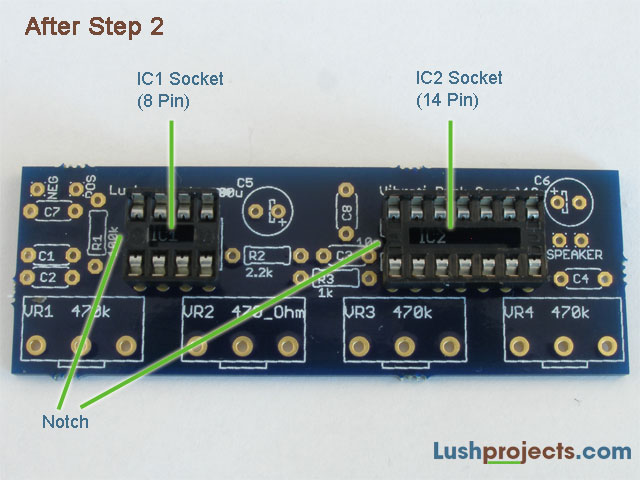
You’ll start building with the sockets that will
contain the
Integrated Circuits (or “ICs”) in the finished project. You will have
two
different sockets one with 8 pins and one with 14 pins. The pins are
arranged
in two parallel rows. At one end of each socket there is a notch in the
plastic. This notch shows the correct orientation of the socket. It is
vital that
you put the socket in the board the right way round and that
subsequently the
ICs also go in the socket the right way round! We use sockets because
the ICs
can be damaged by heat; therefore for beginners using sockets is a
safer option.
Referring to the photos and the markings on the
board take
one of the sockets and insert it the right way round from the component
side of
the board. Turn the board over and solder one corner pin and then check
that
the socket is nice and level in the board. If not melt the solder on
the pin
and push the socket in nicely. Now solder the diagonally opposite
corner and
check the socket is still level. With only two corners soldered you
should be
able to level the socket by working alternately on the two corners.
Now solder all the remaining pins. Take care not
to bridge
adjacent tracks when soldering. If you do bridge tracks then use the
“too much
solder” advice from the “Soldering is Easy” booklet or try desoldering
if you
have a desoldering tool.
Step 1
Step 3 - Add Resistors